 Free Palm Reading
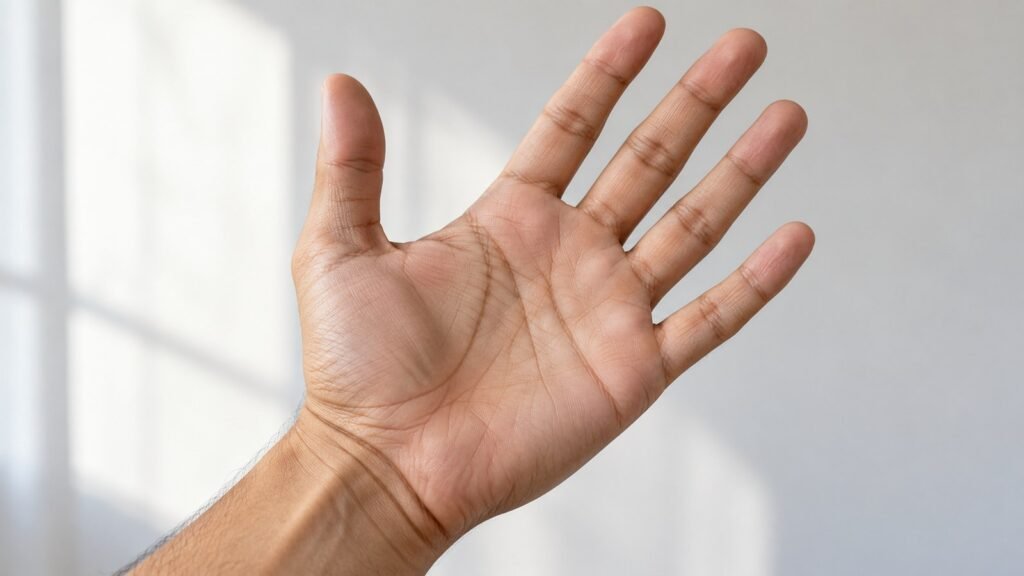
To best show natural palm lines, use bright, diffuse lighting angled to create subtle shadows without harsh glare. Avoid direct overhead or low-angle harsh light that washes out or deepens lines unevenly. Indirect natural daylight or a soft white LED lamp positioned diagonally highlights the texture and depth of lines, revealing their natural appearance without distortion or false shadows.
Understanding Natural Palm Lines and Lighting Challenges
Palm lines are the visible grooves on the surface of the skin of your hand. These lines vary widely in length, depth, and clarity depending on skin texture, hand posture, and individual differences. Because palm lines are subtle 3D features, the way light interacts with them plays a crucial role in how clearly they appear in photos or to the naked eye. Harsh or uneven lighting can create misleading shadows, cause reflections, or flatten details, confusing observers who want to see the lines in their natural state.
Traditional palmistry assigns symbolic meanings to the major and minor lines, but these interpretations rely on a clear visual of the palm. Lighting that distorts the lines risks misidentification and incorrect assumptions. For beginners curious about palm reading, choosing the correct lighting technique means observing the palm’s natural texture and subtle shadows without exaggeration or loss of detail.
Understanding that palm lines reflect skin folds and slight depth, not proven personality traits, helps maintain a balanced approach. Lighting should help you see the physical structure accurately, not dramatize or fabricate features.
Choosing the Best Light Source for Palm Line Visibility
Natural daylight is often the preferred choice for showing palm lines because it provides balanced color and soft, consistent illumination that reveals texture without harsh shadows. Position yourself near a window with indirect sunlight—for example, morning or afternoon light rather than high noon—to avoid intense brightness that can wash out details.
When artificial light is needed, opt for cool or neutral white LED bulbs with diffusers. These lamps mimic daylight well and avoid the yellow cast of many incandescent lights, which can mask finer lines and cause color distortion. Softboxes or lamps with lampshades help soften the light and prevent sharp shadows.
Angle your light source roughly 45 degrees to the palm surface rather than shining it straight down or head-on. This sideways illumination creates gentle shadows along the ridges and grooves of lines, enhancing their visibility. Avoid direct backlighting that silhouettes the palm and obscures details altogether.
Techniques to Highlight Palm Lines without Distortion
Start by warming your hands and relaxing your palm, so natural creases are gently visible. Stretch your fingers slightly to flatten but not overextend the palm surface. Hold your hand steady to avoid motion blur if photographing.
Place your palm close to the chosen light source, adjusting the angle until delicate shadows appear emphasizing the line depth without dark blotches. Look for a balance where the skin texture is visible, and no regions are overly bright or lost in shadow. A slight tilt forward or backward on your wrist helps vary the line visibility depending on hand shape and skin texture.
If photographing, avoid using a flash directly facing the palm. Instead, use ambient or bounced light to preserve the soft highlight and shadow gradient. Using a white reflector (even a sheet of paper) opposite the light helps reduce harsh shadows and illuminate the palm evenly.
Using a macro lens or close-up mode improves the capture of finer lines. Avoid post-processing filters that modify contrast too aggressively, as they may exaggerate or erase subtle details.
Common Mistakes That Hide or Misrepresent Palm Lines
One frequent mistake is using overly strong direct light, such as midday sun or bare bulbs, which can create flattened shadows or glaring reflections. This harsh lighting washes out the gentle depth of lines or creates stark spots that falsely emphasize minor cracks or texture.
Another pitfall is backlighting or low-angle lighting, which can create silhouette effects or misleading line shadows, preventing clear observation. Similarly, photographing palms in too dim environments causes grainy images and hides fine lines.
Applying oils, lotions, or moisture before viewing often darkens lines temporarily or blurs the skin surface. While smooth skin looks nice, it reduces natural shadows critical for viewing lines. Excessive bending or clenching the hand causes creases to change shape, making lines look inconsistent.
Lastly, some try to sharpen images excessively or over-enhance contrast digitally, producing unnatural outlines that are not truly present on the palm itself.
Step-by-Step Visual Observation Method
- Prepare the Environment: Choose a well-lit room with access to indirect daylight or arrange a soft white LED lamp. Avoid fluorescent flicker.
- Warm and Relax Your Hand: Wash hands and gently massage the palm to improve blood flow and reduce stiffness.
- Position Your Hand: Place it flat with fingers spread loosely on a neutral background for contrast.
- Find Optimal Lighting Angle: Slowly rotate the light source or your hand about 30-45 degrees until shallow shadows define the main lines naturally.
- Use Reflectors if Needed: Hold a white card opposite the light source to soften shadows and balance illumination.
- Observe Without Distractions: Focus on the major lines (heart, head, life) first, noting their direction and depth rather than symbolic meanings.
- Capture a Photograph: Use a macro or close-up setting on a camera or smartphone without flash. Review the image for overall clarity and shading quality.
Fictional Example: Lighting Setup for Clear Palm Line Capture
Alex wanted to record natural palm lines for a beginner’s guide. Sitting by a north-facing window at mid-afternoon, Alex positioned the palm facing slightly upward. Using a daylight-balanced LED desk lamp with a diffuser lamp shade angled 45 degrees from the right, the lines cast subtle shadows enhancing their visibility. Alex pressed a white sheet on the left side as a reflector to reduce gray shadows without flooding the palm. After warming the hand with gentle rubbing, Alex photographed with a smartphone macro mode, avoiding flash. The resulting image showed clear, softly detailed palm lines without glare or harsh shadows. Alex supplemented the photo by rotating the hand slightly to catch different line angles and compared these to historical symbolic charts on FreePalmReading.io, knowing this lighting ensured the lines reflected actual skin features rather than lighting artifacts.
Lighting Comparison Checklist for Natural Palm Lines
| Lighting Type | Effect on Palm Lines | Recommended For | Notes |
|---|---|---|---|
| Indirect Natural Daylight | Soft shadows, true color, balanced contrast | Casual viewing, photography | Best mid-morning or afternoon; avoid direct sun |
| Diffused LED Lamp | Controlled, soft shadows, adjustable | Indoor photography and study | Use lampshades or softboxes; neutral white preferred |
| Direct Flash | Harsh glare, washed details | Not recommended | Can obscure lines and produce false highlights |
| Incandescent Bulbs | Warm tint, uneven contrast | Occasionally for mood but less ideal | May distort natural hues, hide fine creases |
| Backlighting | Silhouettes, hides details | Avoid | Lines become difficult or impossible to see |
Practical Exercise and Actionable Tips
Try this simple exercise to observe your natural palm lines under optimal lighting:
- Find a window with indirect natural light or set up a soft white LED lamp.
- Wash and warm your hands with warm water and rubbing.
- Place your palm flat with fingers slightly apart on a neutral-colored surface.
- Adjust your light source to about 45 degrees to your hand’s surface.
- Slowly rotate your palm and lamp to find where lines cast the most natural, soft shadows.
- Use a white paper or card opposite the light to brighten shadows gently.
- Optional: Photograph using close-up mode without flash to compare angles and visibility.
Key takeaways:
- Diffuse angled light reveals line depth best without harsh distortion.
- Avoid direct or backlighting that hides or exaggerates lines.
- Relax your hand and use a stable setup to capture true palm detail.
For more detailed observational guidance, visit the reading step one page on FreePalmReading.io.
FAQs About Lighting and Palm Lines
What kind of light shows palm lines most naturally?
Soft, indirect natural daylight or a neutral white LED light angled around 30-45 degrees best reveals natural palm lines by creating gentle shadows that highlight the lines without glare or washing them out.
Can smartphone flashes help capture palm line details?
Generally, smartphone flashes are too harsh and direct, causing glare and flattening details. Using ambient or diffused light and avoiding flash leads to clearer, more natural images of palm lines.
Why do some lines seem to change appearance under different lighting?
Because palm lines are subtle skin grooves, lighting angle and intensity change shadow shape and depth perception, sometimes making lines look deeper, lighter, or even invisible depending on illumination and hand posture.
Does moisturizing or oily skin affect how palm lines appear?
Yes, oily or moist skin reflects more light and tends to blur shadows, making fine lines less visible. For best visibility, palms should be clean and dry but not dry enough to cause cracking or flakiness.
Conclusion
Capturing and observing the natural lines on your palm requires attention to lighting quality and angle. Soft, diffuse light angled to create gentle shadows reveals the delicate topography of lines more effectively than harsh or direct sources. By avoiding common mistakes such as strong flash or backlighting, and by positioning your hand relaxed under well-chosen illumination, you can see lines with clarity and true detail. Remember, palm lines are rich in texture and tradition but do not convey guaranteed personality traits or life events. Observing them clearly supports respectful curiosity and personal exploration. With practice and the right lighting, your palm can be studied as a fascinating natural pattern—visible and meaningful as a piece of human anatomy and cultural heritage.
Further Reading
- Cheiro’s Palmistry for All – A historical text outlining traditional palm line symbolism and classifications.
- Palmistry, the Future in the Palm of Your Hand? – An article on the historical context of palm reading as entertainment and cultural practice.
See what your own palm inspires
Bring these ideas to life with a reading focused on you. Choose a reading type and upload a clear palm photo to explore an encouraging interpretation.
Explore more palm reading and palmistry guides.