 Free Palm Reading
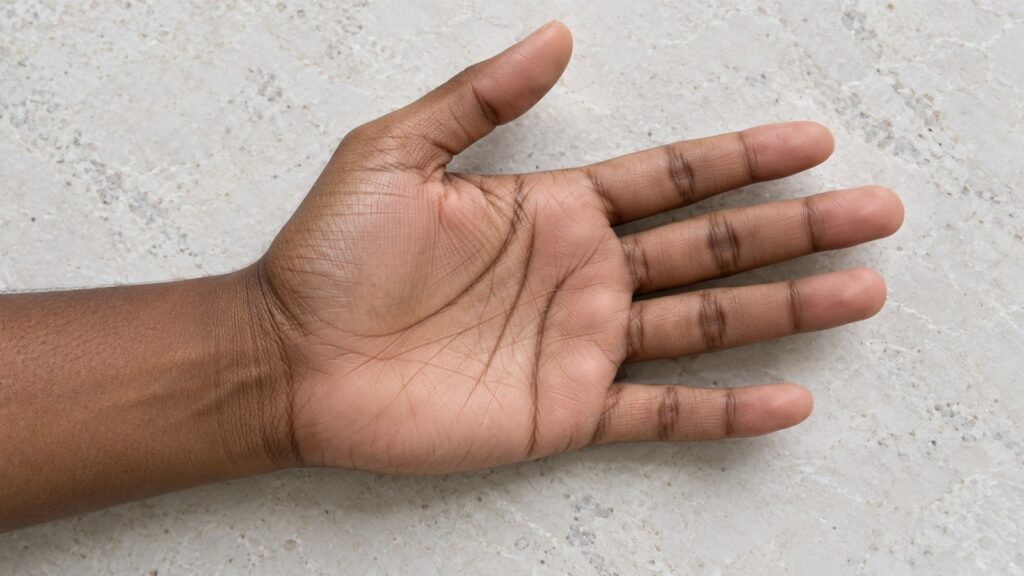
Editorial note: Palmistry is entertainment and folklore. A palm photo does not establish health, lifespan, personality, fidelity, or future events. The exercises below separate visual observations from optional creative themes.
When taking palm photos for palmistry study or personal reflection, the question often arises: should you hold your hand relaxed or stretched? This choice affects what details are visible, how natural the image appears, and how easily you can compare features across different photos or study sessions. This article guides you in making a purposeful choice between a relaxed hand and a stretched hand in palm photos, explaining why it matters, how to execute each position well, and how to evaluate your results.
Why Hand Position Matters in Palm Photography
The hand’s pose changes how creases, mounts, and overall palm texture are shown. Palm lines do not establish fate or character; this activity is for observation and entertainment. Your goal in photographing palms is to capture clear, consistent, and faithful images that respect the hand’s natural form. The difference between a relaxed hand and a stretched hand can therefore shape your interpretation and the quality of documentation.
Key Considerations:
- Line visibility: Stretching smooths some lines but may obscure finer creases.
- Natural appearance: Relaxed hands show the palm as it normally sits, helping realistic observation.
- Consistency: Using the same pose across images makes comparison easier over time.
- Comfort: Comfortable positions reduce tension artifacts and movement blur.
Task: Take an Effective Palm Photo Using a Relaxed or Stretched Hand
This guide leads you through deciding which hand position to use and how to photograph it to best suit your purpose. We will compare the two options, list steps for each, and offer a troubleshooting path to improve your images.
1. Choose Your Hand Position Purposefully
| Criteria | Relaxed Hand | Stretched Hand |
|---|---|---|
| Lines and creases | Shows natural crease folds, including minor lines | Can flatten the skin, simplifying lines but may hide subtle wrinkles |
| Natural look | More authentic adult hand shape | Appears more rigid and sometimes unnatural |
| Ease of comparison | Use a repeatable, comfortable pose when comparing photographs. | Good for emphasizing major lines but harder to replicate exactly every time |
| Ease of photographing | Requires less effort, less muscle strain, lower chance of blurring | Requires careful finger positioning and muscle tension |
Choose relaxed hand if your aim is to capture the hand’s everyday posture and subtle natural lines. Do not force a stretch to make the image fit a diagram. If the receiving service requests another view, follow its instructions within your comfort and ability.
2. How to Photograph a Relaxed Hand
- Ask the subject to rest their arm comfortably on a flat surface.
- Gently open the fingers so the hand lies flat, but without forcing finger or palm extension.
- Ensure fingers are neither curled nor overly rigid—thumb naturally away from the palm is ideal.
- Position the camera above the palm, parallel to the surface, with diffuse lighting to avoid shadows.
- Focus on the central palm area to capture lines clearly, include the full palm and part of fingers.
3. How to Photograph a Stretched Hand
- Ask the subject to open the hand only as far as comfortable; do not force full extension.
- Extend the thumb gently away from the hand, creating a broad, flat palm.
- Hold the hand steady on a surface or in the air with a relaxed wrist.
- Position the camera perpendicular to the palm surface using even lighting.
- Ensure focus and exposure are set to highlight the major creases and mounts without glare.
Hypothetical Example: Seeing Differences in Detail
Imagine photographing two palm views of “Alex.” In the relaxed photo, Alex’s minor wrinkle near the base of the thumb is visible, softly folding with the skin. In the stretched photo, the thumb’s skin smooths tightly, causing that minor line to almost vanish. The main life line, however, appears more defined and straighter in the stretched photo, but it slightly curves and overlaps with neighboring creases in the relaxed photo.
This invented example illustrates a possible difference between two photographs, not a result that every hand or camera will reproduce. Depending on your inquiry or reflection, you may favor one over the other or document both for comparison.
Troubleshooting Palm Photo Challenges
- Lines appear blurry or indistinct: Check your camera focus and increase lighting without harsh shadows.
- Hand looks distorted or unnatural: Relax your hand more; don’t overstretch. Let muscles rest between shots.
- Fingers overlap or shade the palm: Spread fingers enough to expose the full palm, but keep the hand comfortable.
- Inconsistent photos over time: Use a simple checklist (see below) to replicate the hand position and camera setup for consistent documentation.
Hand Position & Photography Consistency Checklist
- Hand position: relaxed / stretched (circle one)
- Fingers spread comfortably: yes / no
- Thumb position (away from palm, relaxed): yes / no
- Arm supported or raised
- Camera angle: directly above, parallel to palm plane
- Lighting: diffuse, even, no harsh shadows or glare
- Focus: sharp on palm lines
- Exposure adjusted for skin tone and color
- Date and time of photo
Use this checklist each time you take photos to create a reliable photo series you can observe or reflect upon later.
What to Do Next: Reflect & Document
After capturing palm photos in your chosen hand position, take time to observe. Note which lines and features appear clearly and which are less distinct or change between relaxed and stretched photos.
Create a brief reflection journal or worksheet comparing the two poses:
- Which hand position reveals the lines or features you find most interesting?
- Is the natural hand shape important for your reflection or study?
- Do you see changes over time in relaxed photos that match daily variations?
By carefully deciding on hand position and documenting your photographic approach, you build a personal palmistry visual library grounded in clear observation rather than guesswork.
Frequently Asked Questions
Can stretching the hand damage the palm lines or skin?
Do not force or hold an uncomfortable pose for a photograph. Follow any personal movement restrictions and stop if it hurts; this guide is not a safety assessment for an individual hand.
Is one hand position more “correct” for palm reading traditions?
Requirements differ by service or exercise. Use a comfortable pose and document it; do not assume there is one universal photographic standard for palmistry.
Should I photograph both hands the same way?
Yes. Use consistent positioning (relaxed or stretched) on both hands to make meaningful comparisons and keep your photo records uniform.
How do lighting differences affect the appearance of hand position photos?
Uneven or harsh lighting can exaggerate or obscure lines regardless of hand pose. Always aim for soft, diffuse light from multiple angles where possible.
For further reading on palm line orientation and mindful reflection after photographing, see Where Are the Main Palm Lines? A Visual Orientation Guide and Palm Reading Reflection Guide.
Prepared with AI assistance for education, observation and entertainment. Palmistry does not predict outcomes or provide professional advice.